Pour-over coffee for beginners: the complete starter guide
Pour-over is the simplest way to make genuinely good coffee at home. You pour hot water over ground coffee sitting in a paper filter, gravity pulls it through, and a clean, bright cup lands in the carafe below. The gear is cheap, the method is forgiving once you understand it, and you control every variable — which is the whole appeal. This guide walks every beginner decision in the order that actually matters, with no hype and no fabricated taste tests.
One promise up front. Specs here are verified against manufacturer data and current Amazon listings, and the brew ranges follow widely-accepted SCA-style guidance — not internet folklore. Where I share a preference, it comes from seven years of home brewing in Seattle, currently rotating a V60, an Origami and a Kalita Wave; I will say so when an opinion is mine rather than a number. If you came for one specific question, jump to the section that applies from the cards throughout the page. If you are at the planning stage, read top to bottom.
What pour-over is, and why it works
Pour-over is a manual drip method. Ground coffee goes into a paper filter that sits in a cone (the brewer or dripper), and you pour hot water over it in stages. The water dissolves flavour compounds out of the grounds — this is called extraction — and drains through the filter into the cup. Because you decide how much water goes in, how fast, and at what temperature, you have direct control over how the coffee tastes. That is the difference from an automatic drip machine, which makes those decisions for you, usually less carefully.
The reason pour-over tastes clean and bright is the paper filter. It traps the fine particles and most of the oils, leaving a cup that is clear rather than heavy. A French press, by contrast, uses a metal mesh that lets oils and sediment through, so it tastes thicker and more rounded. Neither is better — they are different cups. Pour-over suits people who want to taste the character of a good light or medium roast, which is why specialty roasters lean on it.
The four things you need
You can start pour-over with four pieces of gear plus filters. Here they are in order of how much each one changes the cup, which is not the order most people buy them in.
- A grinder. The most important purchase, and the one beginners skip. Coffee starts going stale within minutes of grinding, and a cheap blade chopper produces uneven grounds that brew sour and bitter at the same time. A burr grinder crushes beans to a consistent size, which is what makes a clean cup possible at all.
- A brewer (dripper). The cone that holds the filter and grounds — a V60, Chemex, Kalita Wave or Origami. This decides the style of cup and how forgiving the brew is.
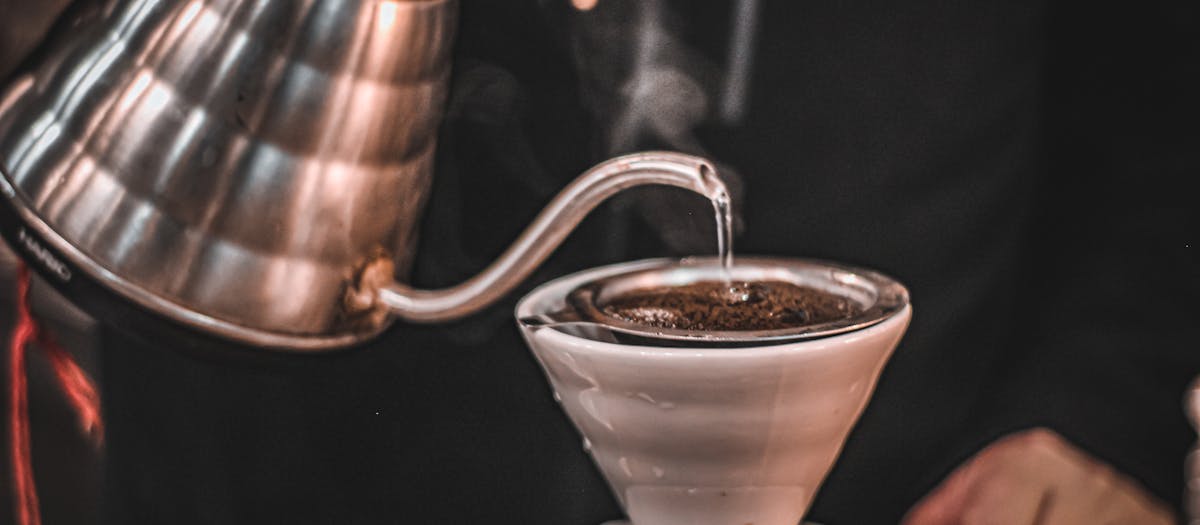
- A kettle. Ideally a gooseneck kettle, which has a long, narrow spout for a slow, controlled stream. Even pouring is most of good technique, and a gooseneck makes it easy.
- A scale. Pour-over is a recipe. A scale lets you weigh the coffee and the water so every cup is repeatable, instead of guessing and getting a different result each morning.
Plus paper filters, which are cheap and specific to your brewer — a V60 filter does not fit a Chemex. If you only have the budget for one quality upgrade, make it the grinder. A great brewer fed badly-ground coffee makes a worse cup than a basic brewer fed evenly-ground coffee.
V60 vs Chemex in plain terms
The two brewers a beginner usually weighs up are the Hario V60 and the Chemex. They make different cups and ask different things of you, so the right one depends on what you want.
The V60 — fast, bright, sensitive
The V60 is a cone with a single large hole at the bottom and spiral ridges up the sides. Water drains quickly, which gives a bright, clear, tea-like cup that shows off a light roast. The trade-off is that it is sensitive: your grind size and pour speed change the result noticeably, so a scale and a steady gooseneck pour help a lot. It is the brewer to choose if you want to learn control and dial in your coffee. It is cheap, too, especially the plastic version.
The Chemex — clean, forgiving, elegant
The Chemex is a single glass vessel — brewer and carafe in one — that uses a much thicker proprietary filter. That thick filter slows the flow and traps more oils, producing an exceptionally clean cup and smoothing over small pouring mistakes. It is more forgiving for a beginner and brews larger batches well, which suits households serving two or three cups at once. The thick filters cost a little more, and the cup is cleaner and less heavy than a V60.
My honest take: if you want easy, reliable results and brew for more than one person, start with a Chemex. If you want to learn the craft and chase the brightest cup from a single serving, start with a V60 — and weigh everything. The Kalita Wave (a flat-bottomed brewer with three small holes) sits between them: more forgiving than a V60, brighter than a Chemex, and the one I reach for most often. The brewer guide compares all four, including the Origami.
Grind size and water temp — the two dials that matter
If you change nothing else, get these two right and your coffee improves more than any gear upgrade. They are the two dials that decide extraction — how much flavour you pull out of the grounds.
Grind size — medium, like table salt
For pour-over, aim for a medium grind, roughly the texture of table salt or coarse sand. Grind size controls how fast water flows through the bed of coffee. Too fine, and the water drains slowly, sitting on the grounds too long and over-extracting — the cup turns bitter and harsh. Too coarse, and water rushes through, under-extracting — the cup tastes sour, thin and weak. If your coffee tastes bitter, grind a little coarser; if it tastes sour, grind a little finer. Adjust in small steps and change only one thing at a time.
Water temperature — 195 to 205°F
Brew between 195 and 205°F, which is about 90 to 96°C — the widely-accepted SCA-style range. Water straight off a rolling boil is around 212°F (100°C) and tends to scorch the grounds and taste bitter, so let it rest 30 to 45 seconds, or use a variable-temperature kettle. Lighter roasts taste best near the top of the range; darker roasts smooth out a few degrees cooler. A kettle with a thermometer or temperature setting takes the guesswork out, which is why the gooseneck kettle and the temperature dial tend to get bought together.
That mention of the bloom matters. When hot water first hits fresh coffee, the grounds release carbon dioxide and puff up. Pouring a small amount of water first and pausing — the bloom — lets that gas escape so the rest of the water can extract evenly. Skipping the bloom is one of the most common beginner mistakes, and it is free to fix.
Why a scale beats eyeballing it
Pour-over is a recipe, and a recipe needs measurement. A coffee scale lets you weigh your beans and your water to the gram, so when a cup tastes great you can make it again — and when one tastes off, you can change one variable and see what happened. Scoops and eyeballed pours introduce so much variation that you never learn anything from a bad cup. A scale with a built-in timer is ideal, because brew time is the third thing worth tracking after weight and grind. You do not need an expensive one to start; you need one that reads to 0.1 grams and responds quickly.
The first $200 setup
You do not need to spend much to brew well. Here is how I would allocate a first budget of roughly $200, weighting it toward the parts that change the cup, with the understanding that exact prices move and you should check current listings.
- Grinder (about half the budget). A solid entry-level hand grinder with steel burrs is the heart of the setup. This is where the money does the most work, because no brewer fixes uneven grounds.
- Brewer (modest). A plastic V60 or a ceramic Kalita Wave is inexpensive and brews as well as anything pricier. Spend little here at first.
- Kettle (moderate). A simple stovetop gooseneck gives you pour control on a budget; a variable-temperature electric gooseneck is the upgrade to make once you are committed.
- Scale (modest). A basic 0.1-gram scale with a timer, or a dedicated coffee scale at the budget end, finishes the kit.
- Filters (cheap, ongoing). Buy the filters that match your brewer. These are the consumable you will rebuy forever.
Spend more later on the grinder and kettle as you settle in — those are where upgrades are felt. The brewer and scale rarely need replacing. If you want this as a printable checklist with the ratio and temperature cheat sheet, the newsletter box at the bottom delivers exactly that.
The beginner mistakes worth skipping
None of these are hard to avoid once you know them. They are simply the patterns that show up again and again with newer brewers.
- Buying pre-ground coffee. Ground coffee goes stale within minutes and is ground for the wrong method. Buy whole beans and grind right before you brew — this is the single biggest upgrade.
- Grinding the wrong size. Too fine tastes bitter, too coarse tastes sour. Aim for medium, like table salt, and adjust in small steps.
- Using boiling water. Water straight off the boil scorches the grounds. Let it sit 30 to 45 seconds, or use a kettle that holds 195 to 205°F.
- Skipping the scale. Eyeballing amounts means you never learn from a cup. Weigh coffee and water at a 1:16 ratio to start.
- Not blooming. Pour a little water first, pause 30 to 45 seconds to let the gas escape, then continue. It costs nothing and evens out extraction.
- Pouring fast and unevenly. A slow, controlled stream in steady circles wets all the grounds. This is what the gooseneck spout is for.
Frequently asked questions
What is pour-over coffee, exactly?
Pour-over is a brewing method where you pour hot water over ground coffee held in a paper filter, and gravity pulls the water through into a cup or carafe below. You control the water, so you control the brew. It produces a clean, bright cup and uses cheap, simple gear — a dripper, a filter and hot water.
What do I actually need to start pour-over?
Four things: a brewer (dripper), a grinder, a kettle and a scale, plus paper filters. You can start with a plastic V60 and a basic hand grinder for under $80. The grinder matters most — pre-ground coffee goes stale fast and never grinds evenly, which is the single biggest reason a home cup disappoints.
What is the right coffee-to-water ratio for pour-over?
Start at 1:16 — one gram of coffee for every sixteen grams of water. For a single cup, that is about 20 grams of coffee to 320 grams of water. A 1:15 ratio brews stronger, 1:17 brews lighter. Adjust by taste once you have a baseline, but weigh both coffee and water with a scale so each cup is repeatable.
What water temperature should I use for pour-over?
Aim for 195 to 205°F (about 90 to 96°C), which follows widely-accepted SCA-style guidance. Off the boil is fine — water cools a few degrees the moment it leaves the kettle. Lighter roasts like the hotter end of that range; darker roasts taste smoother a little cooler. Boiling water straight onto coffee tends to scorch and taste bitter.
How fine should I grind for pour-over?
Medium, roughly the texture of table salt or coarse sand. Too fine and the water drains slowly and over-extracts, tasting bitter; too coarse and it rushes through and under-extracts, tasting sour and weak. Grind size is one of the two dials, alongside water temperature, that change the cup most — so adjust it in small steps.
Do I really need a gooseneck kettle?
It helps a lot, but it is not strictly required on day one. A gooseneck spout gives you a slow, controlled stream so you can wet the grounds evenly, which is most of good pour-over technique. You can start by pouring carefully from a regular kettle, but a gooseneck is the upgrade most beginners notice immediately.
Is V60 or Chemex better for a beginner?
A Chemex is more forgiving and makes a very clean cup, because its thick filters slow the flow and even out small pouring mistakes. A V60 is faster, brighter and more sensitive to grind and pour, so it rewards a scale and a steady hand. Beginners who want easy results lean Chemex; those who want to learn control lean V60.
What are the most common beginner mistakes?
Using pre-ground coffee, grinding the wrong size, pouring water straight off the boil, skipping the scale and eyeballing amounts, and not letting the coffee bloom on the first pour. None are hard to fix once you know them. Fresh whole beans, a medium grind, water at 195 to 205°F and a scale solve most of them at once.
Where to go next
The four silos, each starting from a beginner-first hub.